Accessibility features on your smartphone or tablet can be a game-changer, enabling you to get the most out of your education. As a blind or partially sighted student, knowing how to use the accessibility features at your disposal can super-charge your learning. For a refresher on how your device can help you during your studies and what some of the common accessibility features are, check out the homepage for this guide.
Apple devices have a good reputation for accessibility and ease of use for blind and partially sighted people. Apple mobile devices such as iPad and iPhone run on the iOS platform. There is a great range of accessibility features on iOS for you to explore. Trying out new tools and features can be challenging at first. But it is always worth persevering, giving yourself a chance to learn them and get used to how they work. So, give them a try, you might wonder how you managed without them!
Let’s dive into the different accessibility features built-in to Apple iOS devices and how you can get started with them right now…
Jump to: screen reader, magnification, magnifier apps, colours and font sizes, voice control.
VoiceOver – screen reader
VoiceOver is the built-in screen reader used on iOS devices. Enabling VoiceOver can transform the way you use your device and allow you to interact with your smartphone/tablet without even needing to look at the screen! You can explore items on-screen by moving your finger around, swiping and using gestures, while the selected content is read out to you.
When you start VoiceOver for the first time, there is a handy tutorial which will guide you through all the most common commands, this can also be found in the VoiceOver settings menu.
VoiceOver is a powerful tool and is a popular feature with blind and partially sighted users. It could be a game-changer for you!
Top tip – use gestures to increase your productivity!
You can interact and control your device by using gestures you make with your fingers on the screen. They are like keyboard shortcuts (without the keyboard). Gestures are a brilliant and quick way to use your iPad/iPhone and is a major productivity hack. Here is a list of all the different gestures, give them a try!
Spoken content – selective screen reading
If you find it useful to listen to on-screen content, rather than reading it, but don’t want or need the full VoiceOver experience, there are some features on iOS that can help. Under the ‘spoken content’ section of your device’s accessibility settings menu, you can switch on two different settings:
- ‘speak selection’- this allows you to select text (as you would when copying or pasting) and have it read out to you. Once you select the text you want read out, simply choose the ‘speak’ option which will appear in the menu on the screen.
- ‘speak screen’ – this feature can be helpful in practically any app that contains text. You can perform a swipe down with two fingers from the top of the screen and the contents of the screen will be read aloud to you.
You can also adjust the voice and speed to suit your preference. These features are unobtrusive but are there when you need them.
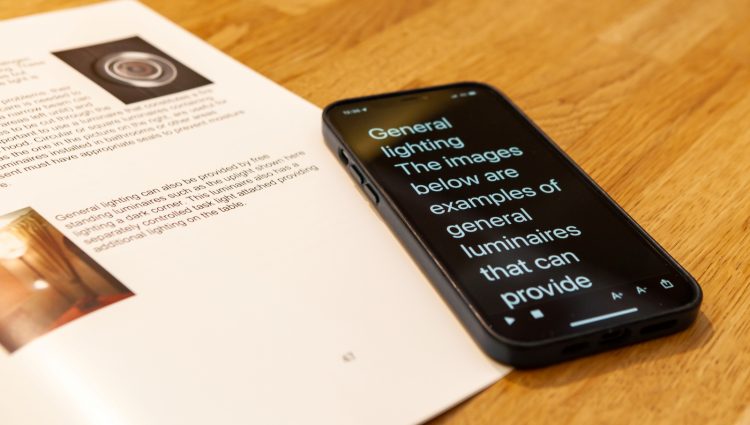
Zoom – magnification
If you’d prefer to enlarge the content on your screen, you can do this using a built-in accessibility feature called ‘Zoom’ (not to be confused with the app we were all using during the pandemic for video calls). You can physically zoom in to your screen, to make content easier to see.
Once zoomed in you can either use the zoom controller or pan around the screen using a simple three-finger touch gesture to navigate and control your device. There are options for windowed or full screen zoom, so you can find the style of magnification that works for you.
Top tip – use Siri to control accessibility features
You can ask Apple’s Siri voice assistant to switch on most accessibility features like invert colours, VoiceOver and dark mode for you. But if you prefer to get to these settings without talking to your iPhone/iPad, they are all available right at the top of your device’s accessibility settings menu.
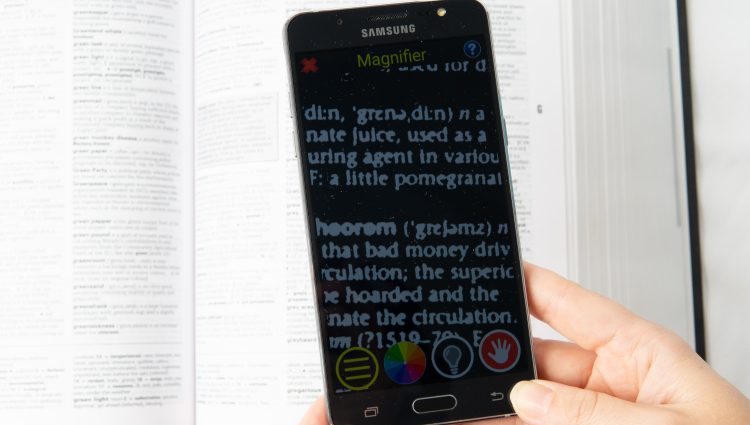
Magnifier app – using your device’s camera to make things bigger
Apple devices running iOS also have a built-in app called ‘Magnifier’, which is an app that uses the camera to magnify content, acting like an electronic magnifier. You can zoom in to objects that are close by or far away, just like when taking a photo with your phone’s camera.
Magnifier provides a range of colour and contrast adjustments to make it easier to read text. It can also be used to freeze an image of something like a piece of paper so you can apply zoom and filters at your leisure.
There are also other free apps available on the App Store that can provide a similar experience such as ‘ReBokeh’, an app specifically designed to provide a simplified interface for distance magnification.
You may find a specialist electronic magnifier to be a better solution, check out our Useful accessible accessories page to find out more.
Colours and font sizes – make your screen easier to see
Big or bold – or both? On your iOS device, there are a range of settings you can change to make it easier to see what is happening on the screen. These adjustments do not require you to use the VoiceOver or Zoom features but could make a massive difference in helping you to access your smartphone/tablet.
Dark mode
You might be used to everything on your iPhone/iPad being displayed as black text on a white background. For some this can make the screen harder to see, create glare and eye strain. Apple has a feature called dark mode which switches this colour combination to white text on black. This feature can be great for anyone who finds it easier to access content on a dark background.
It’s important to know that not every app or website supports dark mode, but the list is growing all the time.
Increased contrast options
Sometimes, a little finer tuning is needed to be able to read your screen. Dark mode can improve visibility of text in some apps, but for times when that doesn’t work, you can use a feature called ‘Smart invert’ instead. ‘Smart invert’ and ‘Classic invert’ are features which flip the colour of content shown on the screen. This will usually mean content will be displayed as light text on a dark background.
It works similarly to Dark mode but applies the colour theme across all content displayed on the screen, whereas Dark mode is limited to supported apps. You can also use it when you come across an app with a contrast that you find hard to see.
Colour filters
If you have a specific set of colours that work well for you, iOS provides a range of built-in colour filters for you to try. These filters give you added options for changing how colours are displayed.
If you have already enabled colour inversion and would like to see text with a different colour to white, this could be a good feature to explore.
Large and bold text
If you find text can be a little small to read on your device, but you don’t want to always rely on the zoom feature to magnify the display, you can increase the size of the text. Sadly, this doesn’t take effect in every app, so it’s always best to have zoom on hand just in case.
Additionally, you can apply a setting called ‘Bold text’ to make all text bold on your device. If you find a bolder font would make it easier for you to read the content on screen, enabling ‘Bold text’ could really help.
Reader mode
In the Safari web browser on iOS, there’s a reader mode which displays written articles in a clear and stripped down text-only format. You can set the font, size and colour theme the content is displayed in. By tapping the reader mode icon, located at the left-hand side of the address bar in Safari, you can access all the settings for Reader mode.
Voice control
If you prefer to access your device using your voice, Apple’s Voice Control feature can help you talk to your device to perform specific tasks.
Voice Control can be used in combination with the VoiceOver screen reader, though for best results you will want to use headphones so as not to confuse your device.
Top tip –talk instead of type
Anytime the on-screen keyboard shows on your iOS device, you can use a feature called Dictation to enter text by talking instead of typing. You access this feature by tapping on the microphone icon on the on-screen keyboard, then simply dictate what you want to write in the text box. Following a recent update, your device will also add in punctuation such as commas and full stops for you, but you can also speak the punctuation if you prefer. You can also use Voice control to dictate and edit text using your voice, check out this video from Apple to find out more.
Helpful links
Check out these links to find out more about accessibility features on Apple iOS devices:
Useful accessories you might want to try out
Smartphones and tablets are amazing, but they can be even more powerful when you use them alongside other accessible pieces of kit. Bluetooth keyboards, bone conduction headphones, braille tech and much more can all help to super-charge your ability to thrive in education. Check out our Useful Accessible Accessories for Education page to find out more!
Getting the best tech and support for your needs
The technology and features we explore in this guide are a great place to start when it comes to making it easier for you to access your education. But it is important to bear in mind, these are free tools and it is likely you could benefit from more sophisticated (and more costly) tech, software and equipment. So, it is vital your school, college or university support you to explore all available options and use the best solutions possible.
There are a number of ways the right technology can be purchased for you which will not cost you anything. If you are at school or college, speak to your QTVI and other disability staff about funding. If you are studying at university, you can get funding for equipment via Disabled Students’ Allowance (DSA).
The things you do to access your learning are only one piece of the puzzle, your school, college or university have an obligation to do everything they can to support you and make your learning experience as accessible as they can. Find out more about the support you can get: The Professionals There to Support You at School; Six Steps for Starting Secondary School; getting the Right Support in Place at College; The Professionals There to Support You at University.
Need support with accessing your education?
Our Education Information Advice and Guidance Service is here for blind and partially sighted students aged 7+, their families and the professionals that support them. We provide expert information, advice and guidance supporting students to navigate primary, secondary school, college and university.
If you have any questions about accessing your education, please reach out to us by visiting our Education Information, Advice and Guidance Webpage.