We all know how useful smartphones and tablets are for keeping in touch with friends or using social media. But did you know they can be a game changer for your education too?
As a blind or partially sighted student, being able to use a smartphone/tablet effectively can give you access to many useful features and tools to make learning easier and give you more independence. Whether it’s to help you take notes during class, access handouts and slides, keep on top of your schedule, access books for your course, use the camera to magnify things or independently navigate around town – smartphones and tablets have a lot to offer!
The good news is, there are a range of accessibility features built into your mobile devices, which can dramatically improve your experience of using them. In this guide, we will tell you what these features are and how you can get started using them yourself.
Top tip – give it a go and hang in there!
We understand that getting to grips with new features might seem daunting at first. But it’s always worth giving it a try and staying with them to see if they make a difference. Some features might take a little getting used to. But once you’ve given yourself a chance to learn how they work, you might wonder how you managed without them!
Common built-in accessibility features
Most smartphones and tablets have accessibility features built-in, specifically designed to make them easier to use for blind and partially sighted people. Some of these features are hiding in plain sight, just waiting to be discovered; whilst others are tucked away in a dedicated accessibility settings menu.
Here are some great accessibility features for you to know about:
Screen readers and selective screen reading
if you are unable or struggle to see content on a device’s screen, you might find it useful to use a screen reader. All smartphones/tablets include a screen reader app that can read out all aspects of the user interface. This can include menus, icons, text, etc. This means you can fully interact with your device without needing to see what’s on the screen. You can explore and interact with your device using your finger(s) while the device reads out what you are selecting.
They could greatly improve your productivity; allowing you to navigate applications faster, make reading easier, reduce eye strain and help improve your typing accuracy.
You can use them in class to listen to your lecture notes/handouts, read books more comfortably and listen back to or check over your written work to see if it sounds good. And don’t worry about other people hearing your screen reader, you can use headphones.
Using a screen reader can take a little getting used to. But it can be a game changer once you have learnt how it works and given yourself a chance to get comfortable with it!
Check out the pages later in this guide to discover how to get started with the screen readers on Android and Apple devices.
Top tip – don’t want to use a full screen reader? Try a selective one instead!
If you find it helpful to listen to content rather than reading it, but don’t want a full screen reader, selective screen reading can be used to just read out what you need such as an article online.
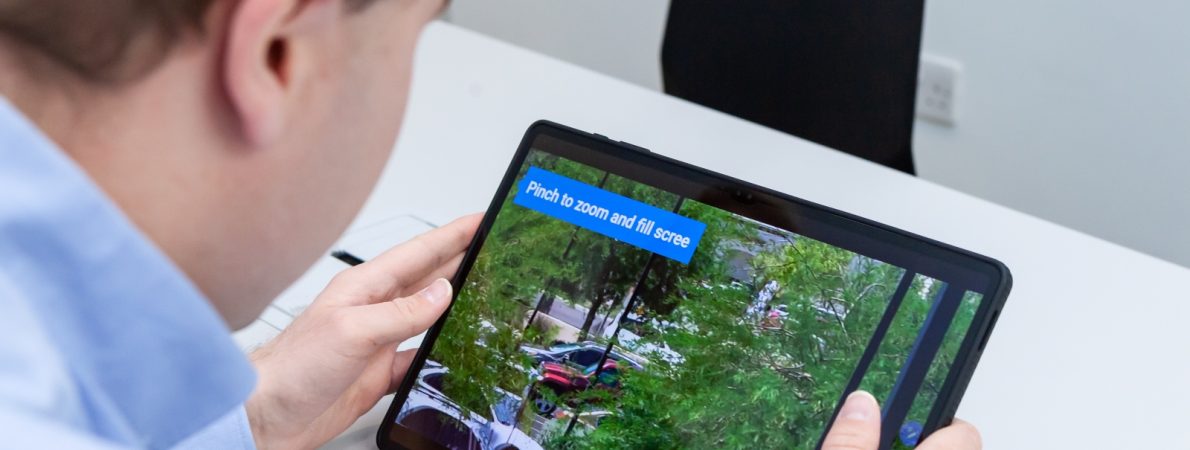
On-screen magnification
If you want to enlarge the content on your device’s screen, magnification could be just what you’re after. The major smartphone/tablet platforms have built-in magnification features which allow you to zoom in and out and move around the screen using your fingers.
It could really help you if you are currently struggling to see everything on your device’s display such as buttons, images, diagrams and text. It can take a bit of practice to get used to magnification, but it could make using your device much easier and more accessible.
The pages later in this guide will walk you through how to get started with using magnification on your Android and Apple smartphone/tablet, so keep reading!
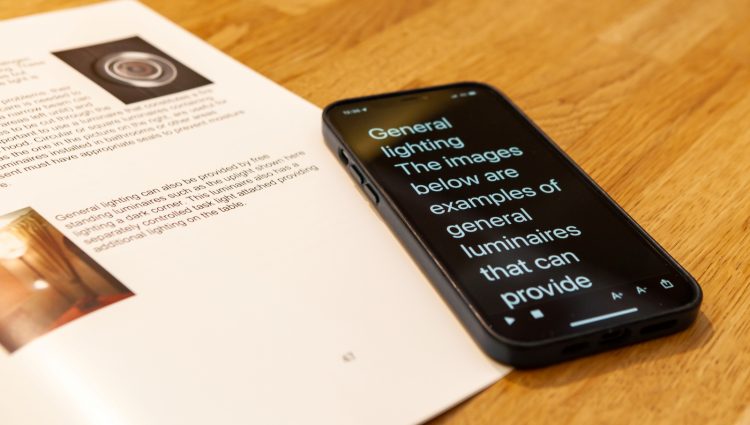
Font size and screen scale
These features allow you to adjust the size of content and text on your device’s display. This is different to on-screen magnification because you still see the whole screen, but the size of the objects is increased to make them easier to see. This could be a good alternative to on-screen magnification, if you don’t want to zoom in and pan around the screen.
Dark mode and colour inversion
The way colours are displayed on your device can make a big difference to how well you can see what is on the screen. By default, most apps use dark text on a light background. For some, this can make it difficult to see the screen or cause eye strain. With features like dark mode and colour inversion, you can flip this to light text on a dark background and other combinations.
Give the different colour options a go and see if they work for you. Find out how to change the colours on your Android and Apple smartphone/tablet on the pages below!
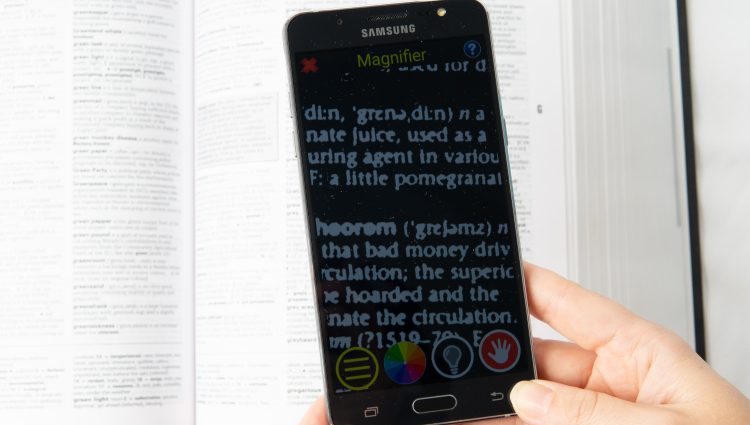
Apps for magnifying content through the camera
One of the handy things about smartphones and tablets is they have a camera. There are a range of free apps which use the camera on the back of your device to magnify objects in a similar way to an electronic magnifier. These apps are either pre-installed or available from your device’s app store.
Check out the pages below to see how to use your device’s camera to magnify things on your Android and Apple device.
Using braille
Did you know your smartphone or tablet will likely be compatible with an electronic braille display? Simply pair the display via Bluetooth to your device and you should be good to go. Braille input is also supported. Find out more about braille devices on our Useful accessible accessories for education page.
Getting started with accessibility on your Apple or Android devices
Not all smartphones and tablets are the same. The most popular mobile devices either run software from Apple or Android. Those made by Apple (including the iPhone and iPad) run an operating system called iOS, whilst most other mobile devices (including those made by Samsung and Google) run the Android operating system.
Generally, all the accessibility features mentioned above are available on both platforms (as long as they are relatively modern versions). The only major differences are in what these features are called and how to find them on your device.
We have divided the rest of this guide into pages for the Android and Apple platforms, where you can find out what their built-in accessibility features are, what they do and how you can get started with using them right now. Check out the pages to get started!
Need support with accessing your education?
Our Education Information Advice and Guidance Service is here for blind and partially sighted students aged 7+, their families and the professionals that support them. We provide expert information, advice and guidance supporting students to navigate primary, secondary school, college and university.
If you have any questions about accessing your education, please reach out to us by visiting our Education Information, Advice and Guidance Webpage.